


Do you track the results of your Facebook campaigns?
Are you using the old conversion code that’s about to be phased out?
Setting up Facebook’s conversion tracking will let you track your return on investment (ROI) down to the penny.
In this article, you’ll discover how to set up and install conversion tracking using the new Facebook pixel.
Two Ways to Track Conversions for Facebook Ads
Facebook will be disabling the old conversion tracking pixel. In preparation for that date, you’ll need to set up conversion tracking using the new Facebook pixel.
The Facebook pixel lets you track conversions for your ad campaigns two ways: with standard events and custom conversions.
The custom conversions method is the simplest form of conversion tracking, requiring no modification of the Facebook pixel code on your website. This tracking method is contained within the Facebook Ads Manager and uses the URLs of the pages you want to track.
The second, more advanced method of tracking your conversions comes from using standard events. This method involves pieces of code that track a specific action and sit within the Facebook pixel on the web page you want to track.
There are nine standard event actions you can track, and installing them requires you to modify the Facebook pixel on your website. Here’s how to get started.
#1: Install the Facebook Pixel
Before you can set up conversion tracking for either method (custom conversion or standard event), ensure that you have the Facebook pixel set up and installed on your website.
You need to install the Facebook pixel on every page of your website. This allows you to gather data on all of your page views and establish a baseline for measuring specific events. For a step-by-step guide on how to install the Facebook pixel, click here.
All successful Facebook ad campaigns, whether you’re spending $50 per month or $45,000 start with a clear strategy.
#2: Choose Which Standard Event Actions to Track
Now you need to decide which standard events to track. Currently, you can track nine event actions: View Cart, Search, Add To Cart, Add To Wishlist, Initiate Checkout, Add Payment Info, Purchase, Lead, and Complete Registration.
The actions you’ll want to track will depend on your Facebook ad campaign objective and the overall goal of your ad campaigns.
For example, if you sell products online and you’re using Facebook ads to generate sales, you’ll want to track ecommerce actions such as Search, View Content (content views on product pages), Add To Cart, Initiate Checkout, and Purchase actions.
In your Facebook Ads Manager, click on the menu button in the top-left corner and click All Tools at the bottom of the menu.
Then under the Assets column, click Pixels.
This opens the pixels dashboard. Under Conversion Tracking Pixel (Old), click the Create Conversion button.
A pop-up menu will appear with the two conversion methods. Select Track Conversions With Standard Events.
Another pop-up box will appear with the nine standard event actions.
![]()
You’ll see a description of each action and a column with the code you’ll need to add to the Facebook pixel on the page you want to track.
#3: Install the Conversion Code on Your Website
Now that you know what actions you want to track and where to find the code snippets in the Ads Manager, the next step is to add the conversion code to your website. How you do this will depend on your website platform and coding knowledge.
If you have sufficient coding skills or have a website developer, you can just manuallycopy and paste the Facebook pixel with the standard event code into the tags of the page you want to track.
If you don’t feel comfortable with coding, you can use a plugin to install the conversion code. If you have a WordPress website, there’s an awesome free plugin called PixelYourSite. It allows you to install the Facebook pixel across your whole site with one click and create standard events for the specific actions you want to track.
To use it, go to Plugins in your WordPress dashboard and click Add New. Then search for PixelYourSite.
![]()
Once you find the PixelYourSite plugin, click Install and then activate the plugin.
![]()
Next, you’ll need to enter your pixel ID in the PixelYourSite dashboard. To find your pixel ID, go to the Pixels area in the Facebook Ads Manager. Your pixel ID is located in the right column under your pixel name.
![]()
Copy your pixel ID and paste it into the Add Your Pixel ID field in the PixelYourSite plugin dashboard. Scroll to the bottom of the screen and click Save Settings. Now the Facebook pixel is installed across your website.
![]()
Next, you need to add the events you want to track. Navigate to the Events tab in the PixelYourSite dashboard and click Add New Event.
In the URL field in the pop-up box, enter the URL of the page you want to track. Make a selection from the Event Type drop-down list.
![]()
If you’re using Facebook advertising to generate signups for a webinar, for example, you’d enter the URL of the confirmation/thank-you page that people see once they’ve signed up. Then you’d select the Complete Registration event.
Or if you’re using Facebook advertising to generate leads, enter the URL of the confirmation page that people see when they’ve successfully submitted the contact form on your website. Then select the Lead event.
Additional fields will appear below the event type that allow you to include more information for greater customization and tracking. For example, you’ll see fields for purchase values, currency, order IDs, content categories, and status of the action you’re tracking.
When you’re finished filling out all of the details for your event, click Add.
![]()
Repeat this process to add events for all of the actions you want to track. Once you’ve added all of your event actions, check the Activate Events box and click Save Settings.
Note: The PixelYourSite plugin features WooCommerce integration. So if you run an ecommerce store on WordPress using WooCommerce, it allows you to create standard events with one click for actions such as Add To Cart, Initiate Checkout, and Purchases with dynamic purchase values.
![]()
#4: Confirm the Tracking Is Working
To check that the tracking is working, download the Facebook Pixel Helper Chrome browser extension.
![]()
Once installed, load one of the pages for which you’ve just created standard events. In the top right of your browser, click the Pixel Helper button. A drop-down will appear with the status of each event you’re tracking on that page.
![]()
If you see a green circle next to an event, it means everything is working fine. Click an action to view the custom parameters and event info.
#5: Use Custom Conversions to Split Standard Events
If you’ve chosen to track multiple pages using the same standard event, you’ll want to create custom conversions so you can see the individual results for each page in your Facebook ads reporting.
For example, if you’re tracking two different webinar thank-you pages that use the Complete Registration event, you’ll need to create two separate custom conversions. If you don’t do this and you just add the standard event action into your reporting, you’ll see an aggregate, as opposed to the individual results.
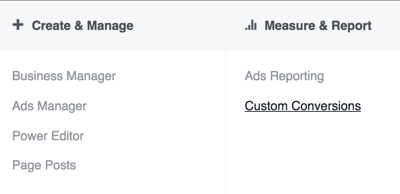
To create a custom conversion, navigate to the Ads Manager menu and select Custom Conversions under Measure & Report.
Then click Create Custom Conversion. In the pop-up box that appears, choose Eventfrom the drop-down menu under Rule.
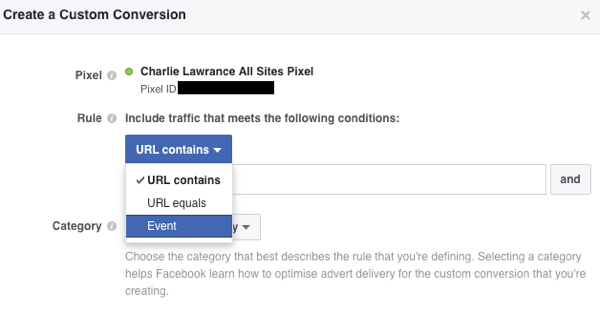
Next, select an event you want to track (Purchase, for example) and enter the parameters associated with the events you created in Step 3 when you added the conversion code to your website.
Finally, choose the category associated with the conversion and click Next.
To check that the conversion is working, visit the trigger page on your website for that event. When you refresh the custom conversions page, the status column should say Active.
#6: Add Conversions to Your Reporting Dashboard
The final step is to create custom conversion columns in your Facebook Ads Manager dashboard.
When you create custom conversion columns, you can measure the exact number of conversions for the event actions you’re tracking. Additionally, you can track other metrics such as cost per conversion and total conversion values for actions such as purchases.
To create a new reporting column in the Ads Manager dashboard, click on the Columns button. Then scroll down and select Customize Columns from the drop-down list.
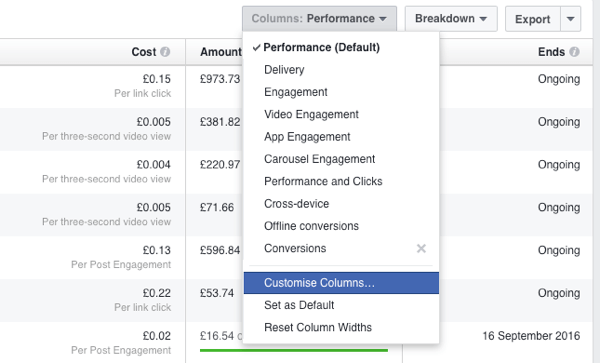
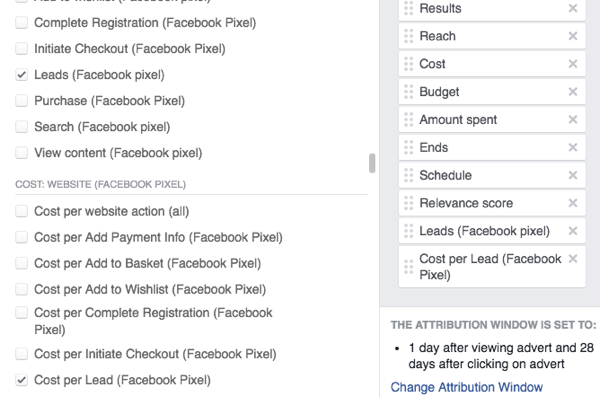
In the left column of the pop-up box, click Website under Conversions. You’ll see a list of standard event actions to choose from.
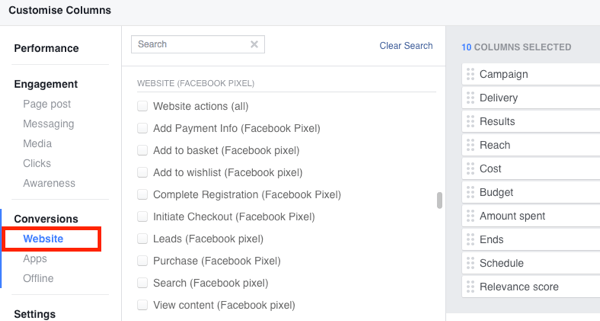
Simply click the check boxes next to the standard event actions you want to add to your reporting and they’ll appear in the right-hand column. Directly below the list of standard event actions, you’ll find the cost per event action metric and below that the conversion value metric.
If you’re running an ad campaign to generate leads for your business, for example, you’d add the standard event field Lead into your reporting, as well as Cost per Lead.
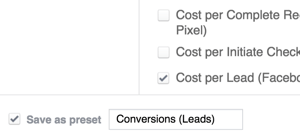
Once you’ve added all of the standard event actions you want to be displayed in your Ads Manager, select the Save as Preset check box in the bottom-left corner of the window. Type in a name for your conversion column and click Apply.
Note: If you’ve created custom conversions, at the bottom of the Website sections you’ll see a list of your custom conversions under the title Website Custom Conversions.
Conclusion
Facebook advertising can be highly profitable for your business. However, the only way to know the true impact of your efforts is to track your campaign results using conversion tracking.
By setting up conversion tracking using the process outlined above, you’ll be able to effectively measure the ROI of your campaigns.
What do you think? Have you installed the new Facebook pixel on your website? Please share your thoughts in the comments below.


